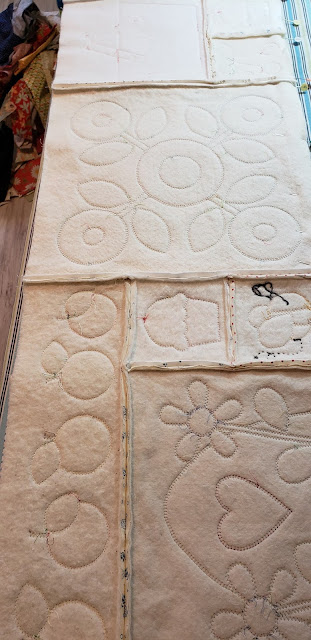
Using this technique will change the way you quilt!
Years and years ago, when I first started quilting, I took part in a beginner quilt class and we made a sampler. When we were done with each block, we quilted them individually ( by hand!) , and then sashed them together to complete our quilt. I remember NOT liking that process at all! It was so fussy and difficult that I never used the QAYG method again…until I came across this book!
This book completely changed the way I approach my quilts and I have not used any other method since I learned how to do it in this manner. I LOVE IT! Can I emphasize that enough?! Hahaha.
There are a few different ways to approach quilt as you go. If you google the method you are likely to find that the method used most often is where you quilt your block ( or row) with top, batting and backing and then join your blocks (or rows) together using sashing.
The method that I use now is so much simpler and works so well, that I believe you won’t want to do it any other way again either! ( Just a disclaimer here: This is not my method, I learned these from Jera’s book, BUT I will add some little nuggets of wisdom that I have picked up along the way!)
There are two ways you can approach your blocks: You can “build” your block right on your batting, OR you can sew your block together the regular way like you usually do. (That is the method that I am using with my Bee Happy blocks!) For clarity sake I am only going to discuss the second method, but check out the other method if you end up buying the book!
So let me explain the method: After you finish sewing together your block, you layer it on your batting ONLY( make that a bit larger than your block). Pin your block in place. Now use your walking foot or free-motion foot and quilt your block. You can quilt in the ditch, or do fancy freeform designs~ whatever you like! When I am doing appliquéd blocks, I fuse my fabrics and then appliqué them while the block is on the batting:
So in this block I haven’t even done any “quilting” because the buttonhole stitch that I used to fasten down my appliqué is right away attaching my block to the batting! And because there is not a lot of open space left I am not even going to worry about quilting the block ( but I could quilt around the shapes, or add swirls in the white background, and I would do that at this point). So this is what my block looks like from the back:
See how the stitches are holding everything nicely in place? No need for extra quilting in this block!
You can imagine how much easier it is to appliqué and quilt on small blocks like these that are easy to twist and turn~ No more wrangling unwieldy quilts through your little machine!
When I finish appliquéing and /or quilting a block, I trim them down to the unfinished required size and then sew them together JUST AS IF YOU WERE SEWING REGULAR BLOCKS TOGETHER. It is super helpful to use a walking foot for this process because you are working with batting. I also use A LOT of pins. And when I am done sewing my blocks together, I press the seams open.
Alright, onto the next step: After you have sewn everything together and your quilt top is now complete it is time to add the BACKING fabric. You are going to prepare this the way you always do….cut it slightly larger than the quilt top, and layer it with the top and baste. You want the back to get attached to the front and batting now. The way you do this is by simple stitching in between the blocks or rows, you can choose in the ditch or next to, or you can cross-hatch…whatever you want! But you can be a minimalist here because the top and batting are already quilted together. ( The batting is what starts shifting after a wash if there is not enough quilting, but you have already looked after that). I usually just quilt in the ditch in a horizontal and vertical direction. Now, you might think, “but now I am still having to deal with pushing a big quilt through my little machine!” That is true, but it is made SO much simpler because you are not having to twist and turn your quilt. You quilt a straight line and then you move your quilt and move on to the next row. Super simple!
As always, if you have any questions, feel free to contact me….I will do my best to help you out!


