a blog about my quilting life...mostly

a blog about my quilting life...mostly
Showing posts with label sewalong. Show all posts

Friday, August 4, 2023

It can't be!

 Oh my, it can't possibly have been since May that I sent you my last blog post, can it?

I do apologize for the very looooong gap! In my defense, May was a super busy month, and then summer really hasn't been all that relaxing, with visits from company, a couple of quick trips to Canada to visit parents, celebrating 3 birthdays, gardening, helping one of our kids pack up and move, as well as a myriad of other little time-stealers that kept summer from being the relaxing, have- all- the- time- in- the- world- to- quilt, kind of time that I envisioned. But I have decided that I am going to take some time now to have some fun before summer is over! This is my new motto~ Ha!


I am trying to think back on the last project I shared with you all, and I can't remember that far back! So I will just share my most recent projects, and hope that you haven't already seen them ( well, unless you are in my FB group or follow me on Instagram. Then you have definitely seen some hints ;) ).

{ please note that my post contains affiliate links~ if you purchase something through my links, I will receive a small compensation, but it will not change your cost in any way!}


I am sewing along with the Bee Vintage sewalong hosted by Lori Holt of Bee In My Bonnet right now. 

The schedule is pretty crazy, with 3 new blocks every week, but so far I am keeping up. It helps that the blocks are all pretty simple and straightforward and there is not much to embroider. Another factor that makes this one quick for me is that instead of hand appliqueing, I am using fusible web! These are some of my blocks so far, and this afternoon I am planning on making the cottage block, which is the one I have been eyeing since the beginning! 


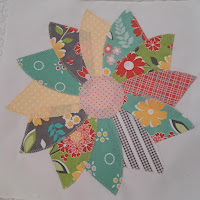
I might just have to make an  ENTIRE quilt with just these cute cottages! 
If you would like to make this quilt, Lori keeps the instructions on her blog forever, so you can always "sew along" at your own pace. The templates can be found here(click).

I have really been enjoying my Accuquilt fabric cutter and *may* have added just a few more dies since we last spoke :D. This fox die just HAD to come and live at my house, and I'm so glad I jumped right on that because it SOLD OUT! But no worries, Accuquilt has added more , so if you want one, put in an order ASAP ( you can use this link here:http://shrsl.com/46b74 ).
 This is the quilt I am currently working on and I love it so much, with all those naughty little colorful foxes! 


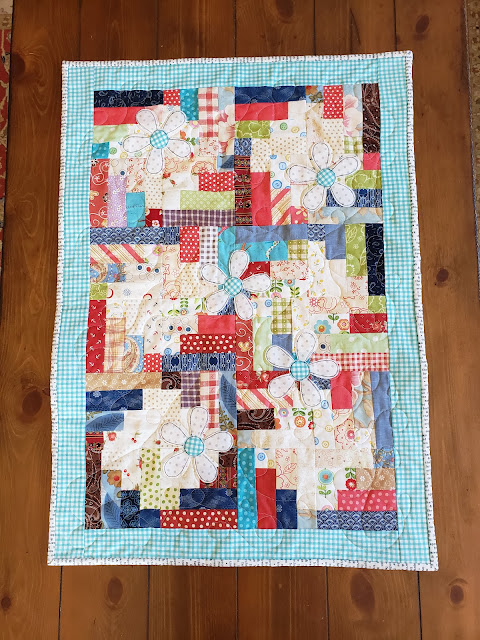
Another quilt I am working on is this one: 

I took advantage of my Accuquilt again to help me cut out all those pinwheel and square pieces ( there were a LOT!). I also used some Lori Holt templates to make that panel in the middle. It is super fun to combine pieces from a variety of sources to make my own unique designs!

In my FB group I hosted a little short sewalong and we made a Hexie coaster using EPP ( English Paper Piecing, for those who don't know, is the method where you sew your fabric around a paper shape, and then sew those shapes together to make a larger shape, after which you remove the papers). It was a fun way to introduce EPP to some folks that wanted to try it. 


This Fall I have been invited to sew along with Fat Quarter Shop on a pattern that is secret for now, but will be revealed in October. They generously allowed me a budget and these are the fabrics I chose to make my quilt:

 I will be sharing some sneak peeks between now and October, so watch for those. The fabrics I chose are adorable and available through this link  ( click).

Oh, and finally, even though I have had the pattern for a  few years now, I finally started on a jelly roll rug! I bought a GIANT bias maker ( click for the link) and am in the process of sewing my strips, after which I will start the construction of the actual rug. I can totally see where they would be addictive to make! One thing that I am trying is using fusible batting, and I'm hoping that will really simplify the construction! 


Alright, I think I have remembered all the most important parts....enjoy these last few weeks of summer, and I will try and stay in touch a little more regularly from here on in!

Happy creating!

Monique


Thursday, June 16, 2022

Lazy summer days

(my blog posts sometimes contain affiliate links that provide me with a small commission if you purchase something~thank you for supporting Farmhouse Quilts in this small way!)

 Hello again, 


 It has been a little longer than I had promised in my last blog post...sorry about that! Sometimes life has different plans in mind, you know?

Now that our youngest is done school for the summer, we are settling into a nice summer routine...no more getting up at 6 am! Now we get up when we feel like it ( although I have to admit I am not one to waste my day away lingering in bed ;), and try not to make many commitments...I love that pace of life!

I have a few quilts in the works right now. I finished my strawberry table runner and will work on getting that pattern into my Etsy shop soon ( You can find me at HyggeFarmhouse). It is a super simple and scrappy pattern that has some sweet strawberry appliques. Here is a peek at it:


It is featured on top of the yellow cabinet that I mentioned in my last blog post. When the college students leave town after graduating, they usually sell a lot ( if not all) of their belongings, so I was able to pick this up from one of them. She couldn't recall the history of it, just that it had been in her family a long time. I ADORE pieces of furniture that aren't perfect and look a bit worn so this one has found a prominent spot in our home! 


I finished this quilt top using my Accuquilt dies and it is currently in Texas being longarm quilted. I have always quilted my own quilts, but my friend said she could provide batting and backing as well as the quilting so I decided to jump at the chance! Here it is before it flew off to Texas: 


It is a simple design, but I have to tell you that I adore it! Or maybe it's the colors I adore? You can never go wrong with red, white and blue. And when they are faded like this and look like they have been used for years....SWOON! :). I'll make sure to share another photo after it is back and bound and ready for use on our porch!

I was a little behind on my embroidery journal but finally got caught up on that! Here is what I have so far...we are about halfway through the year so I think I will have enough room to fit all the weeks. I think it will be a lot of fun to frame this and have it as a reminder of 2022.


And finally, I was invited to sew along with Fat Quarter Shop on one of their Shortcut Quilts. I decided to use some out-of-the-box fabric colors and designs for me and chose these layer cakes:


Go check out the pattern..it is free and fast and will be so fun in a variety of fabrics!

Until next time~happy creating!
Monique


Friday, February 25, 2022

Hello? Spring? Where did you go?

 Hello again, 

Remember when I wrote last week that Spring was looming just around the corner? Well, I was WRONG! Today we woke up to a  layer of fresh SNOW and ICE... I guess I should look on the bright side and be happy that the puppies will not be tracking in any MUD today ;).

We are in the last week of the February sewalong and today's instructions are super simple:  Finish up your quilt, if you haven't done so already. 

To finish up my quilt,  I quilted it in loopsy-doopsies ( not a professional term, but that is what I call these) , using my free-motion foot and lowered feed dogs. 

I also free-motioned around my daisies to make them stand out a bit more. You can see the design way better on the back of the quilt! 
Looks almost professional, doesn't it? :)

Here is another look:


By the way, how cute is that backing fabric with the names of quilt shops all over??

Next, I squared it up ( here is a link to a tutorial on how to do this: https://tinyurl.com/mr3k4fu4) , and  then made binding.

I like to cut my binding 2.5 inches wide, but others like to go skinnier. You choose what you prefer. Here is a great tutorial on how to make continuous binding: https://www.farmandfolk.com/blog/2019/11/13/quilt-binding-tutorial.

For my binding I found this great print that had all kinds of farmhouse words....perfect, don't you agree?

When I finished hand sewing my binding to the back, I made a label and attached that ( I know! Don't fall off your seats now!).
Labels are really easy to do and it is just plain laziness on my part that I don't add labels to my quilts more often. You can buy premade labels, you can use iron on transfers to make labels, or you can print your text off on a computer, trace it onto some muslin with a permanent marker, add a border and sew it down ( that last one is usually my choice). Here is a quick and easy tutorial for a label: https://www.diaryofaquilter.com/labeling-your-quilt/.

Here is the information I included on my label: 

And there you have it, all done!
 

I hope you have enjoyed sewing along and I encourage you to share your results with me, either in the FB group ( you can find me here: https://www.facebook.com/groups/1790902080964624), or via email ( link is under the Contact Me tab in the sidebar or by clicking here: https://myfarmhousequilts.blogspot.com/p/contact-me-hi-there-if-you-would-like.html ) because I always LOVE seeing the different interpretations of a pattern!

Take care, and until next time~happy creating!
Monique

Thursday, February 10, 2022

February sewalong part 2 ....and a finished project....and a new project( you HAVE to see this one!)

( my post contains affiliate links: Please see my disclosure in the sidebar)


 Hello again, 

I'm back with part 2 of our February sewalong, plus some other fun projects that I want to share with you today! Aren't we so lucky to have this amazing hobby/ obsession with this quilting craft? Every morning I wake up and consider what I might work on that day, and that brings me so much joy...oh, the possibilities a fresh new day brings ;).

Alright, let's jump right into part 2 of our sewalong ( if you missed the first part you can read about that here (click).

You have cut all your pieces and are ready to start sewing your blocks together. I found it SO much easier to lay the dark and light fabrics that needed sewing together NEXT to each other, like this: 

Remember that all our "logs" need to measure 4.5" after we have sewn them together, so if you have one that sticks out like a sore thumb you will know that it was sewn to the wrong "partner"! 

You can of course sew these chain-piece style, but I chose to do mine block by block so I could control the colors a bit. 

I used my wool mat ( click) to organize my pieces and laid that next to my sewing machine and then sewed the logs for each block together, like this: 
It is pretty easy to mess up and sew the wrong logs together, ( ask me how I know!) so laying them next to each other in a STAIR STEP way is a great way to keep them organized. Press your blocks.

Pressing your seams open makes it easier to sew your seams later, but do what you prefer. Now is the time to square up each block to 4.5"! If you do it now, you will have a much better chance of having a true-sized 8.5" block when you are done. And don't worry if your blocks are off....as long as they are all off the same amount you will be just fine! I love using my rotating cutting mat ( click) and Cute Cuts Trim it Square ruler ( click) for this purpose. So quick and easy! In fact, I own all the sizes up to 10.5 and they come in super handy for squaring up my blocks in all kinds of projects ( because, you know, my blocks are rarely square :P ).


After squaring up the 4 4.5" blocks, I  sewed my block together, like this: 

CAUTION: Pay very careful attention to how you orient your blocks here! Each block  is rotated once as you go clockwise around so that the long log ends up on the outside so please make sure you do just that! I found it easiest to grab my 4 blocks and lay them all the same direction, and then twisted and turned from there. Once I had made one block correctly, I kept that one in front of me, just to make sure I would orient all my blocks the same way.

Trim your block to 8.5" square. Go on and make as many blocks as you need/want for your project. I think that 3 by 6 blocks would make a nice table runner, and 3 by 3 would make a great small wallhanging. Obviously the bigger project you are planning, the more blocks you will need.

For those of you who decided you want to use 2.5" logs instead and make a 12.5" block, the instructions are pretty much the same. Lay your fabric pieces that will make a completed 6.5" log next to each other and sew them together block by block, BUT remember you only need 3 logs total for each block


Trim your blocks to 6.5" and them twist them to make a 12.5" block, with all long logs to the outside, the same way as explained in the smaller block above. 
 
Easy-peasy, don't you think? But if anything is not completely clear, please ask! 
As I told you last week, these blocks made with the 2.5 " strips come together very quickly and easily and I was able to make this baby blanket super quickly! Rather than adding appliques in the centers of all the blocks, I added one really soft and cuddly cow applique in one corner. Some quick machine quilting, binding, and one label later, I had completed my sweet baby quilt, and in plenty of time before baby's arrival! 

I definitely see more of these quilts in my future!
Alright, so for this coming week you can start sewing your blocks and next week I'll share some ideas and templates for appliques you could use in the center of your blocks.

But before I go I want to share a new project that completely captured my attention this past week:
My online quilt guild, Meander, had a guest teacher named Karen Eckmeier, who is famous for her Accidental Landscapes and Happy Villages quilts. Well, I watched her class on the Happy Villages and fell completely in love with Karen and her fun method of making these quilts, so I just had to start a village of my own! Here are some photos of my progress:  


I am now in the process of free-motion quilting over tulle around each of the shapes and that will take some time, but I will share the finished project sometime soon! And I will definitely be making more of these quilts! You can find out more about Karen here ( click).

Talk to you next week~happy creating!
Monique

Friday, January 28, 2022

Cold winter days...and a new sewalong!

My posts may contain affiliate links. If you purchase through my link, I earn a small commission, but you don't pay any extra. Thank you for supporting Farmhouse Quilts in this manner.


(please click on the title to view this blog post in your browser


 Hello friends!

Back again with another quick update on the kitchen reno, AND a special announcement about a new sewalong!

I hope all of you in North America are staying warm! It has been sooooo chilly here the last week or so! My car really let me know it was not happy being started up at 0* Fahrenheit, but at least it started! And I do love all that sunshine we get when it is so darn cold....makes it more bearable, don't you agree?

This past week we celebrated 2 more birthdays in our house...yep, we really know how to pile things on! But now we are done until July ;). So one of my journal entries was this piece of chocolate cake, to commemorate the cake my hubby bought to celebrate my birthday. 


I haven't yet decided what to embroider for daughter's birthday, but I have until Sunday to come up with an idea!

Our kitchen reno is coming along so nicely! I was able to get the paint we need for our final top coat, so hopefully that will go on this weekend, along with the rest of the hardware. It has been a little tricky opening drawers without handles :P.  And happily we were able to settle on some new and very affordable countertops and a new sink....I am SO excited, especially about the sink! Now comes the hard part of waiting for the company to come out and template and measure....everyone is so busy and the wait is quite long, and have I mentioned that I am not patient?? You will have to wait and see the countertops, but here are some of the samples that we were looking at...

Other than work on the kitchen, I did manage to complete at least one of my projects for January! I started this one a few years back. It is very simple, made up of half-square triangles, all done in reds and whites, but I really like it. I machine quilted diagonally between the rows and then hand-quilted a scallop pattern with a big stitch in the borders. 


See that bright spot in the bottom left corner? That would be the sunshine streaming in! Now it's time for my next Christmas quilt to get finished, although it might have to be delayed a bit because as I mentioned above, I am hosting a new sewalong!
This one is based on a pattern by Lori Holt and will be a great scrap buster! 
( image via Lori Holt)


Isn't it the cutest block? I will be sharing all the instructions right here on my blog in the next few weeks. This is a simple block and I think anyone can join in, no matter what skill level. I will be sharing a few tips and hints along the way, AND will also share a bigger option, for those that would like to use bigger-sized scraps. 
I have been busy sewing up some test blocks too and will share some information about those next week as well. 


Even though there is nothing for you to get ready yet, IF you don't have scraps, you might want to purchase a 1 1/2" strip roll ( click here for some options or here for more options), OR, if you want to make a bigger, alternate version of this block, a 2 1/2" strip roll ( click here for some options or here for more options).

Alright, that is all from here for this week! I hope you will join in on this newest sewalong...I always enjoy seeing everyone's versions at the end!
Until next time, stay warm, and, as always, happy creating!
Monique