a blog about my quilting life...mostly

a blog about my quilting life...mostly
Showing posts with label Lori Holt. Show all posts

Sunday, August 11, 2024

Leaves, logs, and snail trails...

 Hello friends, 

How has your summer been? I hope it has been relaxing and filled with sunshiny weather and some fun sewing projects!

I have been sewing lots, but yet I feel like I have nothing much to show for it. Does that happen to you?

Well, let's get down to some of the projects I have been working on, shall we?

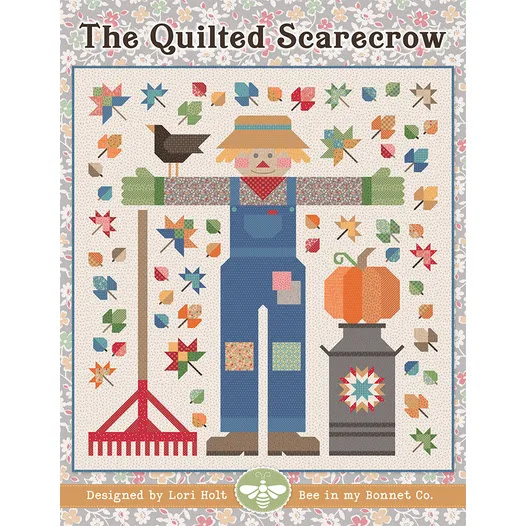
I will start off with the Quilted Scarecrow sewalong, designed by Lori Holt, and hosted by Fat Quarter Shop. 

Here he is, in all his glory:


He is so darn cute, isn't he? In real life the colors are brighter, but it has been so dark and rainy here this past week, that I needed all overhead lights on to snap this photo and that washed him out a bit :). 

The Quilted Scarecrow is a year-long sewalong, so if you want to make him, you can easily catch up! Here is a link to the details: CLICK. All we have been making these past months is leaves, and next month is the BIGGEST leaf collection yet, so you have time :). Here are my leaves so far:


Aren't they pretty? I love leaves when they are not dull and brown, but colorful and happy instead!
If you are here to read some tips and hints for this month's leaves, here they are. Not very many this time around because these leaves were pretty simple to construct:
  • to cut the 3.5" squares, just unfold your fabric at one corner and cut what is needed.
  • to see the markings on your ruler more easily when cutting dark or busy fabrics, turn your fabric right side down.
  • you only need 13 stem units, not 15, so just cut what you will actually need.
  • if you are using the kit, it is super helpful to write the number as well as the name on each fabric piece, because there are several with the same name. I wish I had done this at the start, but I'm adding them as I'm working on the project.
  • unless you are a perfect cutter, piecer, and presser, your pieces are likely to be a little wonky. Just trim each unit as close to the desired size as possible and everything will be fine!


Can you tell some of mine are wonky?

Other than leaf sewing, I have been making logs and trails as well....

I finally caved and bought the Accuquilt Log Cabin die..
You might think ( as I did), why buy a die for cutting straight strips? Well, let me tell you, cutting the strips was so easy...and fast...and fun! I had all those pieces cut in no time flat, and they were all PERFECT. I truly enjoyed every....single....second of the making of this quilt top!


This beauty is now patiently awaiting layering and quilting....
Another die I played with was the Snail's Trail die. Now I have to tell you honestly that I had never been a huge fan of the Snail's Trail block...

...but then I saw a scappy Snail's Trail and that quilt was GORGEOUS! So I bought the die and proceeded to make my own scrappy version!


Unfortunately, the snail pattern got a little lost in all the busyness of the scrappy fabrics, so I am planning a new design with a little more controlled colors. But in the meanwhile these blocks will still be super fun to look at ;) 


 Again, the components for these blocks were cut so fast and easily, and that is really the huge negative for owning these Accuquilt products~ I produce quilt tops so quickly that I can't keep up with the quilting! Ha! I am of course kidding~ I just love how easily and quickly I can make my quilts!

If you would like to check out either of these dies, you can click here( click), or here ( click). And if you are wondering if Accuquilt might be for you, or you are already a fan, I have a Facebook group dedicated to all things Accuquilt that you can ask to join by clicking here: Made with Accuquilt~a friendly support group( click).

Please know that I use affiliate links in my posts, and if you choose to buy something through one of my links I will receive a small commission. This does not affect your cost in any way. Also, please know that I will never promote anything that I am not 100% a fan of. If I'm sharing it, it means that I love it and think you will too!

Alright, I think that is enough sharing for one post I think. I will be back soon with more projects and hints for the sewalong.
If you happened upon my blog post by chance, thanks for reading! And if you are a long-time subscriber, thank you for your loyalty!

Until next time~happy creating!
Monique

(p.s: want to make sure you receive a notice via email every time I publish? Just send me a note and I will add you to my mailing list! I promise that the only person who sees that list is me and your information will never be shared ( I don't like to be on all those SPAM email lists either!)

Saturday, July 13, 2024

On scarecrows, summer, and a little bit of sewing

 Happy July, everyone! ( although I am a little confused as to where June disappaeared to so quickly?!)

I hope you are all having a nice, relaxing summer, with lots of sewing time thrown in! 

I have been doing a little bit of sewing, but mostly hand stuff at night, while watching television. But that's okay, it still gets projects done, and maybe it is better if I get something DONE, rather than starting another NEW project ;) ( but NEW projects are soooooo enticing!). 

This is my project these days:


I quilted in the ditch by machine, and now am BIG STITCH quilting with my favorite threads around the flowers and leaves I appliqued on the border. Then I will probably do some handstitching in the white blocks as well....it is going to be a riot of color by the time I'm done!

Speaking of big stitch quilting with my favorite thread, I did the same on this little quilt that I finished just in time to use in decorating our sunporch for the 4th of July holiday!


This was such a fun and quick little project, especially because I sewed the binding on by machine as well. That is definitely a time-saver, although I actually really enjoy handsewing binding...
In case you are wondering, my absolute favorite threads are these Sulky Cotton Petites ( click). What I like about them is that it is just one thread, but it is as thick as 2 strands of regular embroidery floss, and there is nothing to seperate, just snip and start stitching. The colors are all yummy too, and I like that the company will curate special packs that coordinate really well.  I use these for big stitch quilting, as well as embroidery, and some people in my FB group even use them in their sewing machines!

Another little (and quick) project that I made was this one, using the Washingston's Puzzle die from Accuquilt ( click). I was looking for a small die to use up my gazillion scraps, and this little block is perfect for those, as it finishes at just 4 inches! I used to run far, FAR away from making little blocks because I was never able to have them turn out perfectly, but using the dies has changed all that!


 I want to end my blog post by sharing progress on my Quilted Scarecrow quilt along project...
We are now on month 2, and this month is all about sewing more leaf blocks~9 to be exact.
You can see on the finished quilt that there are so many leafs, and the first few months that is all we will be sewing :). P.S. If YOU would like to sew along, here are some links to the project:


IF you are sewing along, I have quite a few hints to share with you this month. I hope they are helpful!
First of all, there is a LOT of cutting to be done, so just be aware of that! I think it took me almost 2 hours to cut all the pieces for these blocks. Now, I do think that if you are using your own scraps it might go a little faster, but I was trying to use the correct fabrics so those took a bit longer to sort out.
 Here are some hints that might help you accomplish some of this month's tasks a little faster or more easily:
  • When cutting multiple squares of the same size, cut a STRIP the correct width first, and then subcut that into the correct size square. ( the same goes for rectangles). Even if you have to cut just 2 of a certain color and size, it is faster to cut a strip that measures 2x the size of the required units, rather than cutting each one individually. 
  • It is very easy for your ruler to slip and slide while cutting fabrics, so using a little bit of "grippy" stuff on the back of your ruler is helpful. I bought skateboard tape and attached little squares on the back of my rulers, but here is an Amazon link to lots of different options ( click).
  • Sometimes it can be hard to see the numbers on your ruler on top of ( especially a green) a cutting mat. Here is my little trick: Place a piece of white printer paper under the left edge of your fabric. The numbers will be much more visible!
  • To keep all your cut pieces of fabric straight, I like using Alphabitties ( click). They are available in a couple of different colors and variations and will make your life so much easier, but alternately you could mark with a pin or a piece of paper. 
  • Make sure to measure each partial block to make sure your final leaf blocks will be true to size. It is very easy to have your blocks end up a very different size when working with small pieces like these, so measuring ( and adjusting if necessary) is important and will prevent frustration.
  • You will notice that there are a lot of squares that you have to mark diagonal lines on this month. Here is a little hack to make that job faster. Rather than doing each individual piece of fabric, I laid my fabric  out wrong side up on my cutting mat, matching the diagonal corners to one line. I then laid a quilting ruler on top ( very carefully) just a teeny bit to the left of the line on my mat. Then I was able to mark all those squares really quickly and easily while pushing down on that particular part of the ruler to prevent slipping! This went so much faster than my usual method and I had those squares marked in no time! 


  • These blocks have quite a few "bumpy" seams. You will probably find it easier to sew those if you start with a little "leader" or scrap piece of fabric.
  • I found that pressing my seams toward the "stem" piece allowed my block to be flatter than when I pressed as suggested. But I don't know if that will cause me problems when we go to assemble the quilt top, so you do as you see fit.
  • Please be aware that you are making 9 leaf blocks so there is no need to cut and sew the components for the tenth stem block!
  • And finally, I found the instructions were a bit lacking for the final steps on putting the block together. Just follow the photo illustrations and you will get there!
Whew, that is a LOT of hints for this month's sewalong, but even if only one person is helped by them that is fine!
I did manage to get all of my blocks made in time to share with you, so yay for me! 
Have fun making yours, and if you are part of my Farmhouse Quilts Facebook group, please share YOUR blocks with me there~ I would love to see yours!


Want to join my group? You are very welcome! I have a great bunch of members who are so sweet and respectful of each other~ you will be welcomed with open arms. Click here to ask to join the group ( click!).

Until next time~happy creating!

Monique

This site uses affiliate links:

I earn a small commission on some purchases with NO  additional cost to you,  the reader.

As an Amazon Associate I earn from qualifying purchases.

Thank you for supporting me in this small, but very much appreciated, way!


Saturday, June 8, 2024

Summer happenings at Farmhouse Quilts


( I use affiliate links in my posts, and when you buy something through one of my links, I get compensated by whichever company you are buying from. This does NOT affect YOUR cost in any way, but does provide me with a few pennies that help keep this blog up and running~ thank you for supporting me in this small way!)

Happy Summer, everyone! ( I know, it is not really officially summer YET, but our youngest son is done school and on summer vacation so it feels like summer to me!)

I am looking forward to NO set schedule and LOTS of sewing this summer...we will see how that works out....you know, something about the best laid plans and all that :D. So far, so good, though!

As I mentioned last time, I am sewing along with the Fat Quarter Shop and Lori Holt on the Quilted Scarecrow quilt! The plan is to make just a few blocks each month, and then by next May we will have this wonderful quilt top!


My kit arrived and it was so much fun to open the box and drool over all the goodies inside! Even though everything was already pretty organized, I wanted to organize for me, so I folded the fabrics and stacked all the same sizes together, and pinned notes with sizes on each stack. I also bought one of those clear plastic bins to keep my finished blocks in. Wouldn't want to misplace any of the blocks and find out I can't sew my top together next Spring!

The sewalong starts this Sunday, June 9th, so I got to work cutting my fabrics and making my first set of blocks. This time around we are making 4 leaf blocks, but there are many more to come!

Here are mine:


As I was working on these blocks I wrote myself some notes, which I thought I would share, because they might be helpful hints to those of you sewing along!

  •  If using the kit, pay attention to which fabrics you are supposed to be sewing with! There are several that are called by the same name ( different SKUs, but same name!)
  • as you are sewing your units, measure each one and trim if necessary to stay on size.
  • when stitching squares onto corners to make triangles, flip and press first BEFORE trimming. The fabric underneath is a great guide!
  • using a leader ( or scrap piece of fabric) before you sew will greatly reduce the chances of your corners being pulled down into the throat plate. Also, using a single hole needle plate is a good idea, if you have one.
  • and lastly, pay careful attention to which colors you should be using to construct your blocks. I already messed up and used red in 2 different leaves, when that should have just been used in one leaf...so I decided to make all my leaves extra scrappy. :P.
I hope these hints are helpful to you, and if there are any you want to add, please do so in the comments!
For more info on the pattern and the kit, click here: Quilted Scarecrow sewalong.

So other than making my leafy blocks I have been trying to finish up some older projects, rather than starting a new one( but it has been SO hard! Ha!)

I finished this quilt top and now need to layer and quilt it. I am tempted to handquilt, but on the other hand, machine quilting would be a lot faster....

This one was based on a quilt pattern I found in a book, but I made mine with my 9" Accuquilt Qube, using just 2 dies. I think it looks way more complicated than that! And, although I'm not usually a purple fan, I do love the way this one turned out! 

The star quilt I made last year needed a little something extra,  so I cut a 8.5" wide border and added ricrac and appliqued flowers and leaves to it. Now I'm in the process of sewing all of them down, before I add them to my quilt center. It is so much easier to stitch items down when they are not attached to a big center!


I still need to decide what to do for the cornerstones, but I will come up with something.

You all know by now that I love doing  handwork in the evening, so I am continuing work on my red and white hexie quilt. I am currently completing the edges, just flying by the seats of my pants really, but I think it will work out. 
 Do you know, I just realized that all these projects were made using Accuquilt dies...it is amazing how versatile a project you can make with their products! IF you would like to check them out, click here click here ( but ask me if you want to know about specific dies I used in my projects!) 


And this segues nicely into my very exciting announcement....

 I have been accepted as an Accuquilt Guru! This means I will be able to attend their educational classes and give workshops and classes to shops and guilds and local groups! But mostly I am just hoping to share new information with my Accuquilt FB group! By the way, if you would like to join either of my Facebook groups you are very welcome to do so by clicking either of these links:
Hope to see you there, but if you are not a Facebook person, I am also on Instagram:  https://www.instagram.com/farmhousequilts/

What are YOU up to this summer? Will you be getting lots of sewing in? What project are you hoping to complete? Drop me a comment below and tell me!

Until next time~happy creating!
Monique