a blog about my quilting life...mostly

a blog about my quilting life...mostly
Showing posts with label tutorial. Show all posts

Friday, February 6, 2026

February 2026 gift sewalong: lined tote bags

 Happy February and welcome to another gift idea sewalong!

This month I decided that a lined tote bag would be a fun idea.  In addition to being lined, these tote bags also have BOXED corners to make them nice and roomy in the bottom. 

You could gift one of these on its own ( perfect for shopping trips), or you could use it as a GIFT bag that holds something special!

And if you are looking at the word "lined" and "boxed" and thinking "oh no", no worries, I have got you covered! If I can do it, YOU can do it, and it turns out that it is really pretty simple :).

{ I based my tutorial on one I found online at the Seasoned Homemaker and then tweaked some of the instructions. Also, please be aware that I use affiliate links in my post and if you purchase something through one of my links I will receive a small commission at absolutely no extra cost to you.}


This is what you will need to make ONE lined tote bag:

2 pieces of complimentary or contrasting fabric,   3 if you want your handles to be a different fabric.

You can get creative with your bag front and use an orphan quilt block, or add applique shapes...or you can just use a cute fabric print. In this tutorial  you will see photos of the two different tote bags I made...one with a quilt block, and one with just a cute print.

This is a very open-ended tutorial so that you can make a tote bag that fits YOUR needs, but the directions are all exactly the same.  So cut your fabric pieces for the SIZE that you want/need!

For convenience sake I am going to tell you exactly the size that I made, but again, size up or down as you wish.

For OUTSIDE of your bag, cut 2 17x17" pieces of fabric. Set aside for now. ( NOTE: If you want to use an orphan quilt block like I did, sew strips of fabric around your block until it is the correct size).

For LINING, cut 2 17x17" pieces of fabric. Set aside for now.

For your handles, cut 2  4" wide strips of fabric by WOF ( width of fabric). You will probably want to trim these down, but it is easier to start with the longest possible.


Take your 2 handle pieces and fold them in half horizontally, wrong sides together, and press.


Unfold and fold each half to that center fold line. Press again. 


Fold the resulting strip on top of  the other side. Press. Then topstitch close to the edge to sew the open edge down first, and then repeat on the other edge.


Set the handles aside for now.

Grab your OUTER fabric pieces, place them RIGHT SIDES TOGETHER and sew along 3 edges with a 1/4" seam, leaving the TOP OPEN.

Repeat with lining fabric, again with right sides together and 1/4" seam and leaving the top open.

Press your seams open as best as you can and grab a pencil or washable marker and mark a dot on the unfinished top edge,  3" away from the side seams on both the left and right  sides of the lining and the outer bag. DO THIS ON BOTH SIDES. These dots will guide you with handle placement a little later on. ( IF you made your bag much WIDER than mine, you probably want to move your handle placement a little further away, and more  towards the center of your bag!)


Now it is time to make your BOXED CORNERS. No need to be scared here, it is really not difficult at all.  
In order to make boxed corners ( which makes your bag bottom just more roomy), you basically have to cut a box-shaped corner at the bottom corners of your lining and bag. You can do this manually or with the Accuquilt Boxed Bag die ( click). ( I will not cover how to use this die in this post because it is already long enough as is. But I will tackle it at some other point and dedicate a post or video just to this die).

MANUALLY: ( Your lining and outer bag fabrics should still be right sides together!)

Grab a ruler and erasable marker and mark a dot 1.5" away from the stitched side seam on BOTTOM of bag.


Repeat this on the other edge. Do this for both the lining and outer bag.
This next part is a little hard to explain in words, but hopefully the photos will help.
Grab one of your marked dots and , while folding a triangle in your fabric, align the bottom edge with your side seam. 


Press that down and then grab your ruler and erasable marker again to mark a vertical stitching line 1.5" away from corner. Pin, stitch on that line, and then trim away the excess. Repeat this on the other corner and then do the lining the exact same way with the exact same measurements.


Turn your LINING right side out.

Insert your lining IN your outer bag fabric so that your fabrics are right sides together and the raw edges are lined up.


Pin at the side seams to keep those aligned. 


Now is the time to decide how long you want your handles to be. Aiming for a length of around 20-26" makes sense, but if your bag is smaller or bigger, adjust the length and trim both your handles to your desired size.
Next, take one of your handles  and pin it in place at one of you marked ( 3" ) dots. There should be 2 dots to guide you, one on the lining and one on the outer bag fabric. You want your handle to get pinned IN BETWEEN your 2 layers! Pin one side of your handle in place and then, without twisting your handle, pin the other end in between your layers at the other marked dot.


Pin the raw edges, and then repeat this process on the other side of your bag with the remaining handle.

Now your entire bag top and lining should be pinned together and your handles are down inside the layers.


Stitch with a 1/4" seam all the way around the top of your bag, BUT LEAVE A 4" OPENING ( I left mine in between my handles on one of the sides).


Use that opening to turn everything right side out. 


Now stuff your lining into the outer bag and press the top seam, pressing that opening you used for turning with a 1/4" seam to the inside. 


Then topstitch close to the top all the way around your bag to stitch the remainding opening closed.


And there you have it! Your LINED,  BOXED bag is all finished!


And remember, this method works the same for WHATEVER size bag you want to make! You could make a giant beach bag or a cute little gift bag. And don't forget that these bags would be perfect for using up some of those orphan blocks, just add some extra border fabric so your block edges stay visible after construction.
If you are using plain fabric you could use some cute applique shapes, which you would stitch down BEFORE sewing your seams together, and just make sure to not place them too close to where the seams will be.


I hope you have fun making some bags! I actually ended up making a whole bunch, once I tried one, so just be forewarned that these can be a little addictive!

As always, if something is not clear, please ask!
Happy creating and see you in March for another gift idea!

Monique


Monday, February 5, 2024

Sweet vintage hearts~ a short little tutorial for you

 Hello friends and happy February! 

( See, we all made it through January just fine, and before you know it it will be SPRING! I have daffodils starting to pop up their greenery already!)

Today I wanted to share a very quick and simple tutorial with you. I have been having a lot of fun playing with these, and figured you might like to get in on the action as well ;).

This is what I've been making: 


{ please be aware that I am using affiliate links, and when you make a purchase though one of those links, I get a small commision, at absolutely NO extra cost to you~ thank you for supporting Farmhouse Quilts in this manner!}


When I walked in the door of my local reuse shop last week, I spied this cutter quilt immediately! The colors, the simple design, everything about it said TAKE ME HOME. So I stuck it in my basket and home it went.( I am a sucker for fabrics and old quilts and buttons telling me to take them home...you too??).

Once home I laid it out to examine it more closely: 

Such a simple design, but so effective! This might be the next quilt that I need to remake....
As you can see there is quite a bit of damage, and upon closer inspection, I could see that this top quilt was sewn over top of another quilt, which had a blanket as batting. Super duper heavy, so I'm not surprised that the quilt did not hold up well. The inner quilt and blanket are also a bit smaller than the top one. Very interesting! 


I really hoped to save this quilt somehow, but the person who sewed the top sewed every seam, and I did not see myself taking out all those stitches....so it will be recreated as closely as possible at some point in the future. In the meantime, I have this wonderful quilt that I can make crafty items with!

Since Valenttine's Day is close, I thought some hearts would be perfect, so pulled out my Go!Me cutter(click) and the Queen of Hearts die(click) and cut out a bunch of hearts....let me tell you that it was sometimes iffy whether my cutter was going to survive that task! In some of the fabric there are so many layers ( 1 quilt, a blanket, another quilt, a backing....) that it took some convincing to run those through my diecutter!

Luckily the cutter is handpowered by ME and there is nothing to break on the dies or cutter itself, so a little willpower got those layers through!

So let me show you how easy it is to make these sweet hearts!
( and if you don't have a cutter quilt on hand, no worries, you can sew together some scraps instead, or just use offwhite or all white fabric like in this example that I found on Etsy!)


Start by cutting a heart shape or use a die cutter if you have one.
It can be whatever shape and size you desire, but I think smaller is more effective.


Next, grab a piece of fabric that you want to use for the back. I used some toweling fabric that I cut up for a red and white Christmas quilt, but then was afraid would shrink too much ( and I was right, thank goodness I discarded that idea!!) 


Lay your heart on top of your backing fabric, like this: 

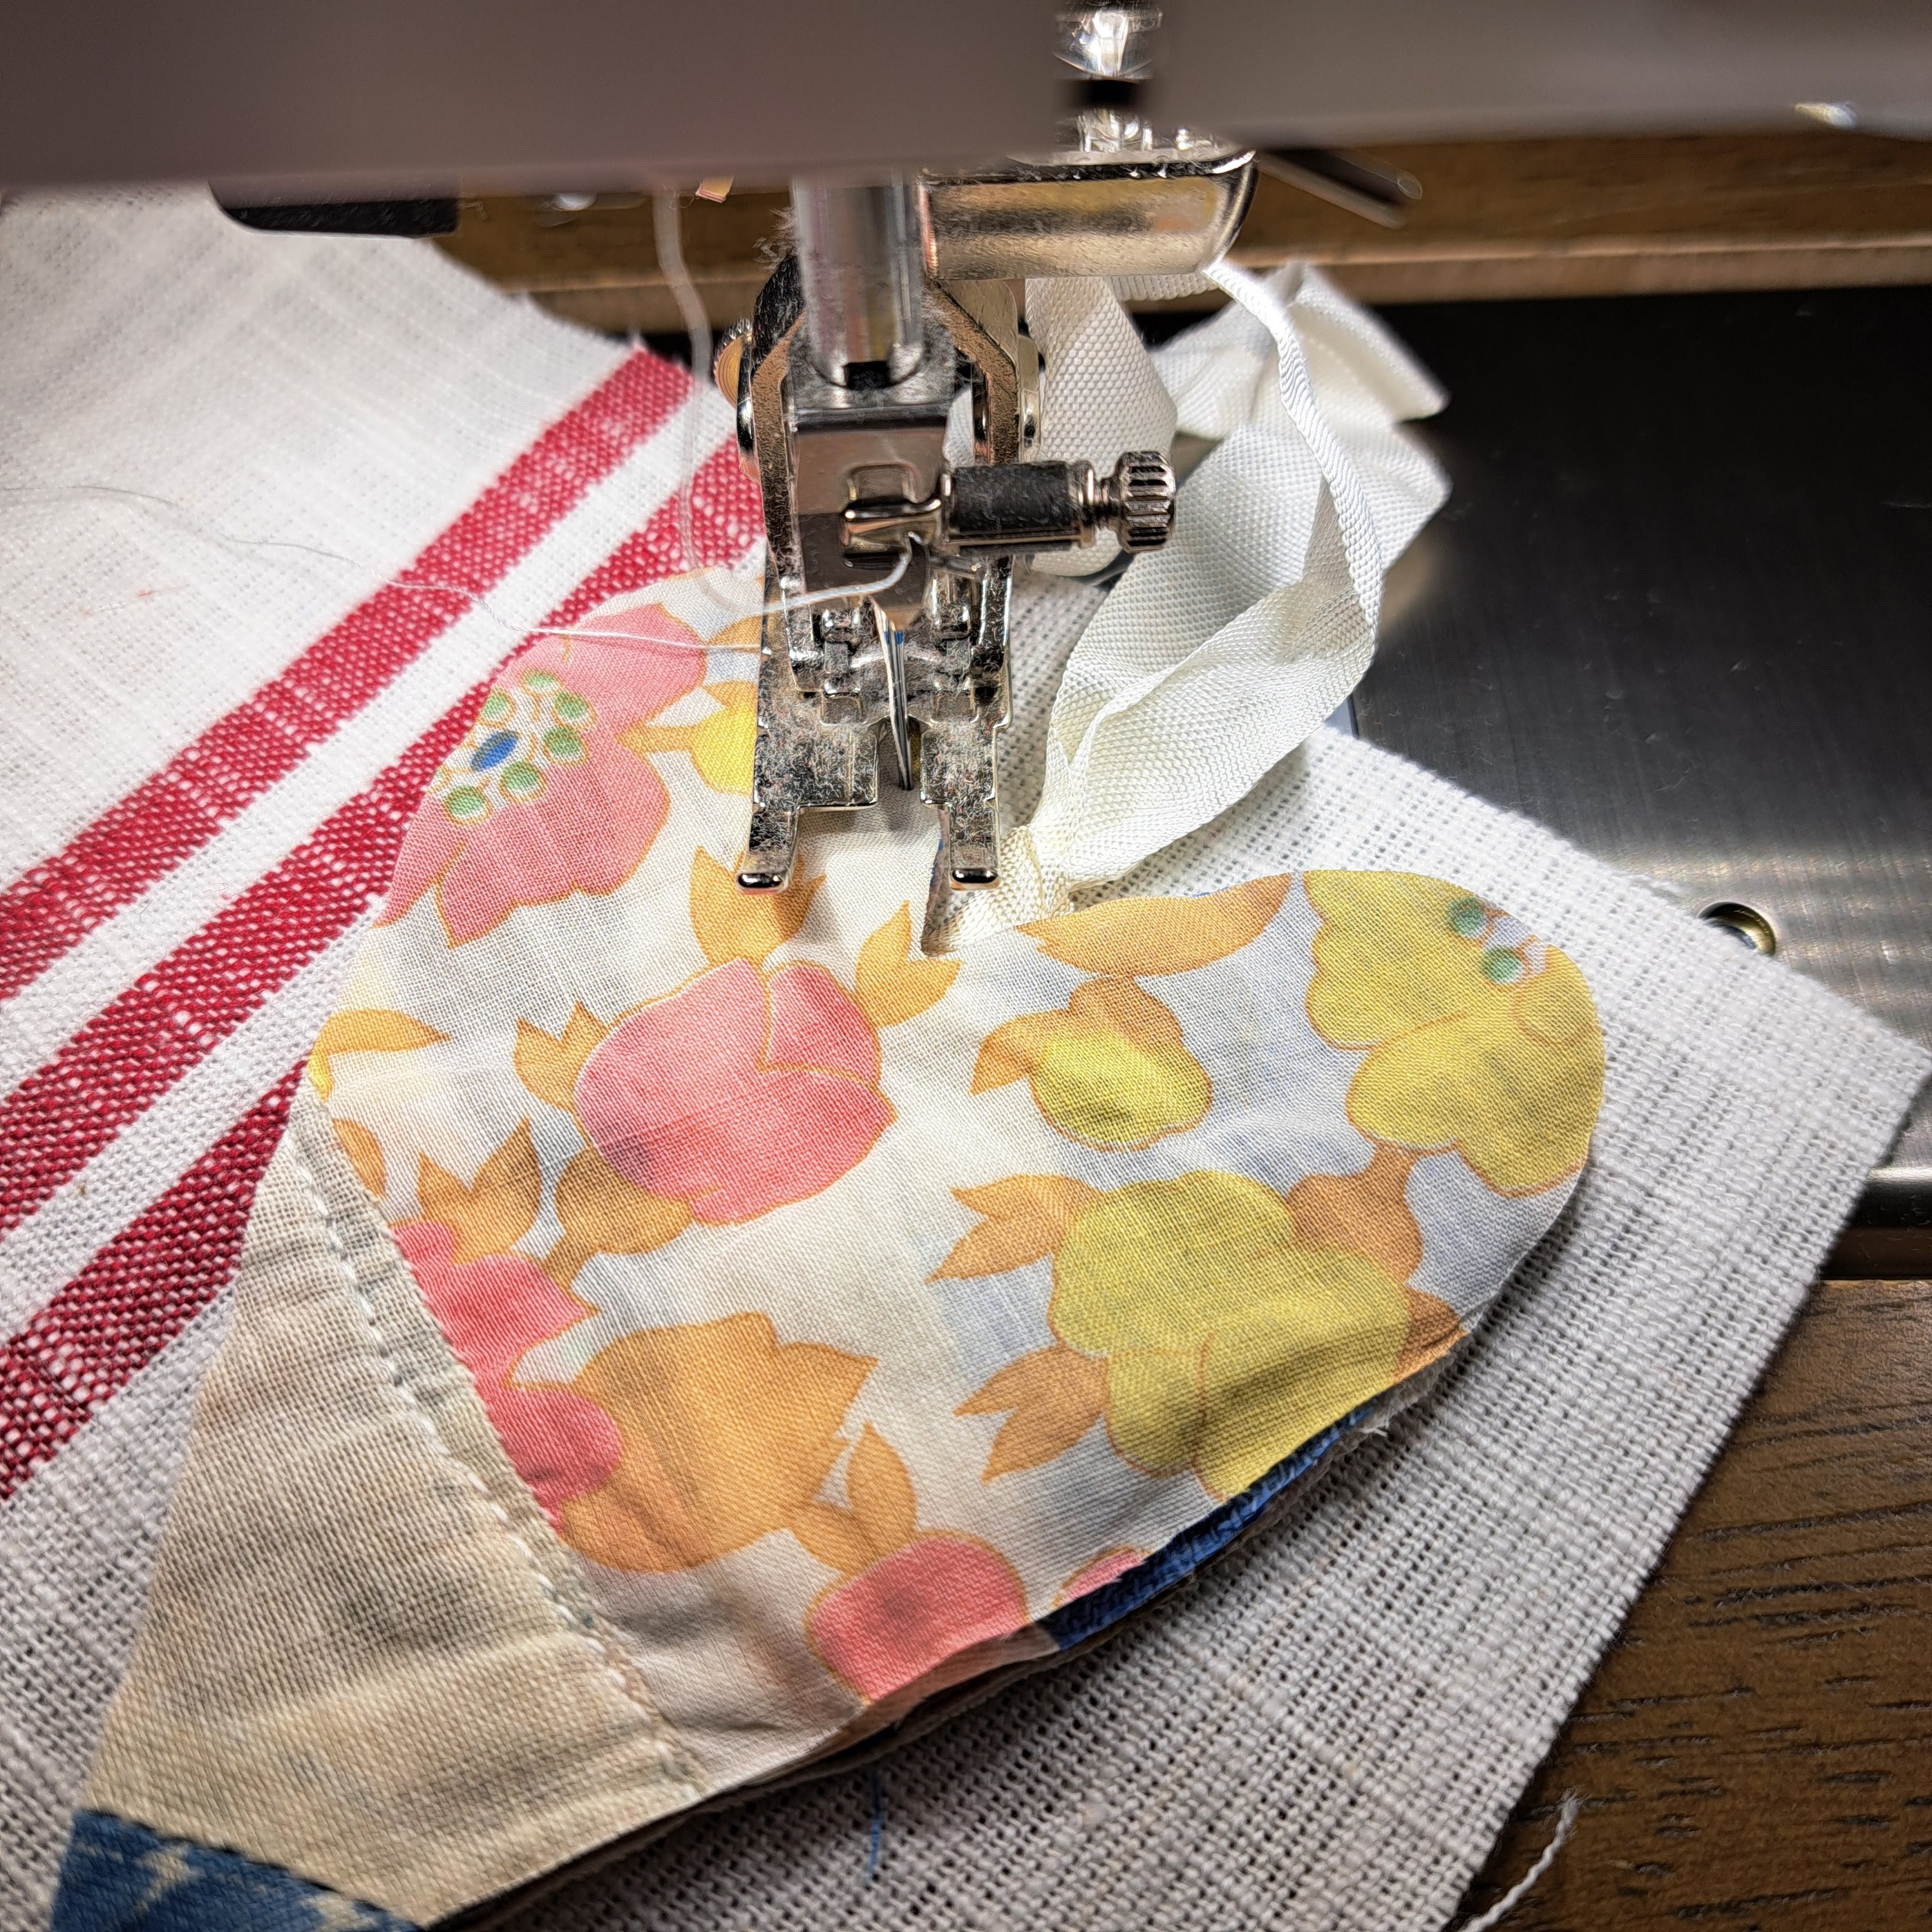
Now take a piece of ribbon, cord, twine~ I used crinkly seam binding~ tie a knot near the bottom to create a loop, and place it in between your top and bottom fabric.


Notice that my knot is just above my heart, but the tails are tucked in between the layers!

Now start sewing around the heart shape, maybe 1/8" from the edge, making sure to catch those ribbon tails in between the layers. You might want to use a walking foot, but I did just fine with my regular foot...


If you are using scrap fabric or plain fabric, it would be nice to add some stuffing in between before you sew around the entire heart, just to give it a little bit of volume.

Next, grab a nice sharp pair of scissors ~ my favorites are these Tim Holtz ones (click)~very sharp, nice serrated  edges, and way cheaper than those that everyone tells you you should buy!~ and cut around your heart shape, being careful to not cut your ribbon.

 Now it is time for some embellishing! Grab a waterproof ( or at least colorfast) inkpad( I use this one~click), some twill tape or other good surface ( don't laugh, but for my first bunch I used the ribbon that comes tied around FQ bundles! Just turn it over and no one will notice there is printing on the other side already! )
Then grab some alphabet stamps ( these ones look great! click) or any other stamp you want to use, anything you like, as long as it fits on your tape!
It is always a good idea to try on paper first, just to make sure you are stamping straight.
  
Then stamp, cut, and attach to your heart with your sewing machine by simply sewing 2 straight lines on both ends. If you want you can sew all the way around, but there is no need to do so.

If you like you can add some buttons now, just sew those on by hand, with thread that picks up the colors in the fabric, or that matches your button...
 

And done!

These are verrrrrryyyy addictive to make, so just be forewarned! 
Here are some more close-ups:


I hope you have some fun making these, and if you can, share a photo with me, either via email or in the FB group! Speaking of FB groups, I started up an additional one that is just for Accuquilt related fun. I am sharing tips and tricks, and will be pointing out good sales when they happen, but members are also encouraged to share their makes, questions, anything at all! If you would like to join, you can go here: https://www.facebook.com/groups/3639364372948605. I strive to make my groups friendly and supportive, filled with generous and kindhearted people, so I promise you will enjoy joining in!

By the way, in case you are wondering about my January Blues quilt that I shared last month ( click here to read about it), I have now completed 21 blocks and am well on my way to the 30 I was planning on making...except these darn addictive hearts have thrown me off schedule a bit! No matter, I will get back to them soon enough! One block a day ( give or take) is really the way to go for this gal, who has the attention span of a 2 year old sometimes~HAHAHA.

In last month's blog post I also promised a birthday giveaway, and the winner of that giveaway is.....Kathy Dostie! Congrats Kathy! Please send me an email or message me via FB to give me your address so I can send you some goodies!

Alright, that is about all I have to share. So, until next time~ happy creating!
Monique