a blog about my quilting life...mostly

a blog about my quilting life...mostly
Showing posts with label gnome patterns. Show all posts

Saturday, February 1, 2025

Gnome Love pillow~An Accuquilt die tutorial

 Hi everyone, 

I'm here today with a tutorial for making this little LOVE pillow using some Accuquilt dies.


Unfortunately I did not take a whole lot of photos, so you will just have to make do with my written instructions. But, as always, if something is not clear please feel free to ask questions!

{ My posts contain affiliate links. If you purchase something through one of my links I will receive a few pennies, which compensates just a little bit for all the time I put into writing these tutorials and it does not affect your cost at all~ Thanks for your support!}

Let's get started, shall we?

Here are the materials I used:

  • Background fabric for the pillow ( 16 W by 12 H), plus fabric for backing and batting ( same size)
  • Fusible web
  • Fabric scraps
  • ruler and water erasable marker
  • stuffing for pillow

*Accuquilt dies :        Carefree Alphabet
                             Gnome
                             Gnome Accessories
                             Flower Shapes
                             Multiple Squares die ( 1.5" finished)

Step 1: 
Cut your background fabric to 16" wide, by 12" high.

Step 2:
Fuse webbing to the back of a variety of red/pink/white fabric scraps

Step 3: 
Use the Alphabet die to cut the letters L, V, and E ( make sure the fusible is facing DOWN).
Use the Gnome die to cut 1 gnome body and nose, the Gnome accessories die to cut the beard and hat, and the Flower shapes die to cut the heart.

Step 4:
Draw a horizontal line on the background fabric, about 4.5" from the bottom of the fabric with erasable marker.
Place the L, the gnome ( all pieces placed together~ see my example), the V, and E on the line, spacing as evenly as possible in the center of your background fabric. Fuse in place, but remember to erase your marker first because heat from the iron can permanently set it!


Step 5: Use the Multiple Squares die to cut 10 squares from your scraps ( that have fusible web) in  a variety of reds and pinks.

Step 6: Draw a horizontal line about 5" up from the  BOTTOM of the letter/gnome placement.


Now measure DOWN from THAT line about 7" to make another horizontal guideline.


Step 7: Place 5 squares diagonally on the top line, and 5 on the bottom line, matching their points to the line.


Fuse them in place, remembering to erase your guidelines first!

Step 8: Place some thin batting or stabilizer behind your background fabric plus appliques and stitch everything down by machine, using a zigzag, straight, or satin stitch.

Step 9: Lay your pillow BACKING right side together with your pillow top and sew around using 1/4 to 1/2" seam allowance, leaving an opening for turning. ( I like to sew around twice for security). Trim corners and turn right side out.
  
Step 10: Stuff your pillow. I used scraps of batting that I cut small, as well as fiberfill stuffing to fill my pillow.
Sew the opening closed and you are done!


I hope you have fun making this little project and do let me know if you have any questions~ I am always happy to help! 
The links to the dies I used are highlighted in blue up above, if you need them.
Have fun creating!
Monique


Friday, October 16, 2020

I am not the only one!

 (Please click the title to read this in your browser!)


Hello friends, 

If you have been following me for a while, you know that I am GNOME OBSESSED. I mean, come on, who could resist those cute little endearing little guys and gals?? I blame the start of my fascination with gnomes on Rien Poortvliet, a Dutch illustrator whose book I have owned for a long, long time. 


Over the years I have picked up some gnome related items, like little ornaments and toadstools ( toadstools and gnomes just GO together!)and was absolutely delighted when other people started showcasing gnomes in fabrics and quilt patterns! Yahoo! My tribe had arrived! 

These are some of my gnomey treasures, some bought or made by me, and some made or gifted by friends and my sister: 


So this week I thought I would share some links to some of these products, just in case you are obsessed and want/need to add some gnomes to your home ~ you're welcome ;). I am always at your service to be an enabler!

Ready, here we go: ( This post contains affiliate links. Please see my disclosure page for additional information.)

This one is so cute, and incorporates gnomes and toadstools and some other sweet forest friends. It is not too big so should be easily finished. I have this pattern and think that I might make it in more realistic colors, plus reds and greens so it can be out for Christmas:

                                                             Click here for the link


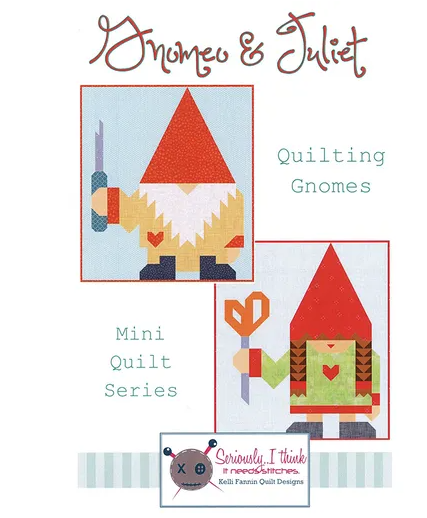
These two are so sweet, and a bit more modern looking: Gnomeo and Juliet! And they are even sewing themed, with a seam ripper and scissors. Kelli always comes up with the cutest patterns and this is no exception!  


I absolutely adore this one ( and yes, I have this pattern too). This one would be a great lap-sized quilt and it comes in two colorways, one more Christmassy than the other so you could choose what you like best. 

                                                     Click here for the link

If you want a little faster project, I am going to recommend this panel! You could add some simple straight borders and voila, a cute wall hanging done in no time!  

                                                      Click here for the link

And yes, you guessed it, I do have this panel ( hangs her head in shame......hahahahahaha)

 And finally I will share this one. I do not own this one....yet, but it is adorable, don't you think?

                                              click here for the link

And if all these patterns aren't enough, here are some adorable fabric cuts featuring gnomes as well!


Who can resist? You know that I cannot! Click here for the link.

So there you have it. A gnome lovers veritable dessert table of goodies.  Enjoy.....and until next time~happy creating!

Monique