Hello friends,
Are you like me and finish all sorts of quilt TOPS, that then end up neatly folded in a closet somewhere because you dread quilting the darn beast on your little domestic machine? Been there, done that! You can let your quilt tops pile up in that closet, or you can send them to a longarmer to have the quilting done for you. OR, you can save yourself closet space and money and quilt your quilt yourself! Without frustration. Without contorting yourself into all kinds of uncomfortable positions. How? Let me share this technique with you that has been an absolute gamechanger for me!
Curious what I might be referring to? It is the Quilt As You Go technique~ or QAYG for short. The QAYG technique allows you to quilt larger quilts on your domestic machine so much easier. How? Read on!
( this post contains affiliate links~please see my disclosure statement in the sidebar)
Years ago, when I was a very new quilter, I learned a different QAYG technique where you made each block ( top, batting, and backing) and then sewed those completed blocks together. It was a very fiddly process and I didn't like it at all! Fast forward a bunch of years and I came across this book by Jera Brandvig with a brand new to me method of QAYG:
The method that Jera used made so much more sense and I have been using it ever since! In the ensuing years I have picked up a few more tips and tricks so I want to share with you how I go about making my quilts using the QAYG method (And I am by no means an expert on this technique, but I can certainly share what I have learned while using this method):
These are the steps:
1. Start by constructing your quilt blocks the way you normally would...whether that is by piecing or appliqueing or a combination of both.
2. When you have completed all your blocks, you cut a piece of batting slightly larger than each of your quilt blocks.
A special side note here: It is very important to use cotton batting because you have to press the seams open and polyester and the heat from an iron equals a big, melty, sticky mess! My cotton batting has polyester scrim, which I didn't realize when I bought it, so I had to be very, very careful, because even that little bit of polyester was a pain! Use all cotton batting!
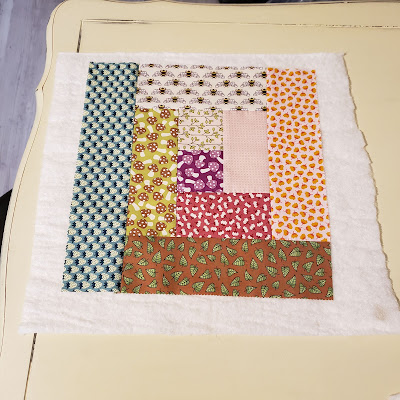
3. Next you layer EACH block onto its own batting square.
You will notice that I marked some quilting guide lines on my appliqued block before I laid it on batting. My pieced blocks I didn't mark because I will be quilting in the ditch.
4. The next step is to quilt every one of your blocks using a walking foot. A walking foot is helpful because it feeds your layers through your machine evenly.
I find that the fabric clings to the batting really well and pinning is not necessary if you are simply stitching in the ditch or making simple lines. If you are making appliqued blocks, now is also the time to do the applique stitching ( zig-zag, blanket-stitch, etc.) as well as quilting, saving you a step!
If you are free-motion quilting your blocks, you probably do want to pin. And yes, you can use this method for free-motion quilting just as well. A few years back, I made a quilt that I free-motioned with feathers and swirls and it was so much easier to maneuver just one block through the machine, rather than an entire quilt! And you don't have to only do one block at a time. If your blocks are smallish, feel free to sew them together first to make a larger piece, which you then layer on batting and quilt. However big, but still easily maneuverable, you want to make it!
5. After you quilt each of your blocks, it is time to trim the batting down to the original size of the block.
Even though it is completely optional, having these square rulers AND a rotating cutting mat make that process so easy!
Your blocks will looks something like this from the back when you are done trimming:
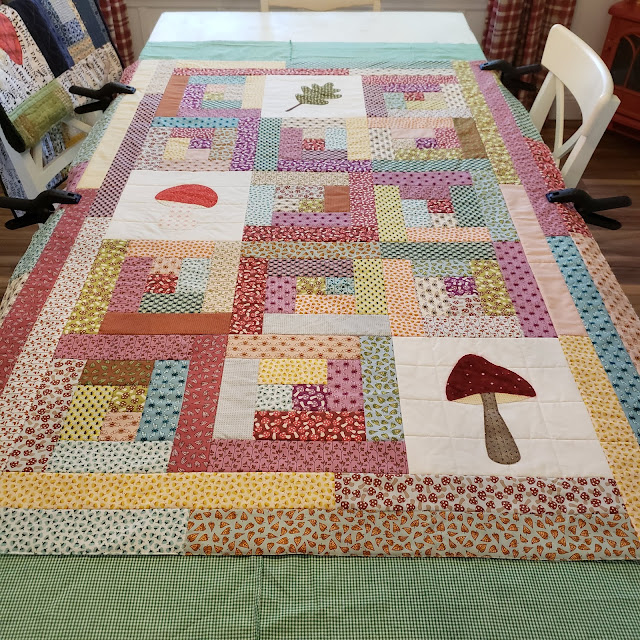
6. Next, it is time to lay out your blocks in order to sew the quilt top together. Remember, the blocks are all quilted but none of them have backing: 7. Now it is time to start sewing the blocks and then rows together, just like you normally would, except you want to backstitch at the start and end, just to give your seams a little more strength. I am not usually a pinner, but I do pin these!
8. After you sew your blocks together, press the seams OPEN ( here is where that cotton batting comes into play!). It can sometimes be a bit tricky to press seams open. I like using my fingers first and then following with the tip of my iron. First I do the back, and then I flip everything over and press from the front. Do not worry if it is not perfectly done. Next, sew your rows together and press those seams open too:
This is what my quilt looked like from the back:
Now I do need to explain this photo, because you may have noticed that I seem to have an extra border on there. I decided that my quilt was not big enough and sewed some border strips together, which I then laid on batting and quilted also, in exactly the same way I did my blocks. Borders are a little more tricky! I avoid skinny borders ( my skinniest one here was 4.5 inches), and you have to make sure that you don't distort and curve them as you quilt. This is especially a problem if you are free-motion quilting. So I suggest doing straight-ish line quilting OR making your border nice and wide. ( or don't do a border at all ;) )
9. Alright, at this point your quilt-top-with-batting is all sewn together and now it is time to add the backing, which is one solid piece of fabric, just like in regular quilts.
Cut your backing slightly larger than your quilt top and baste your layers together with pins or thread.
10. The next step is to quilt some simple lines to hold all your layers together. But because you have already done all the detailed quilting in each of your blocks, all you need now is to do some simple straight lines horizontally and vertically and you can space these lines pretty far apart.
I like to start in the middle and quilt straight lines in the seam allowance and will do all the vertical lines first, and then turn my quilt and quilt all those seams. Yes, I am still pushing that whole quilt through my domestic machine, but this time it is just straight lines, no turning and twisting and it is so much easier!
11. To finish up your project, trim the backing even with the front, and add a binding, just as usual.
And voila, your quilt is done and you haven't had to contort yourself every which way while uttering a few choice words...oh, is that just me? My bad!
Have I convinced you yet to take that pile of quilt TOPS out of hiding and tackle the quilting on your own little machine? I hope so! Give this method a try, and as usual, don't hesitate to ask questions if something is unclear!
And by the way, do you have a friend who would benefit from this post? Forward it to them!
And if you happened to stumble across this and aren't signed up to receive my posts via email, send me an email and I will get you added ( and your email stays just with me...no company will ever be able to buy it!)
Until next time~ happy creating!
Monique