Welcome to May's block, everyone! I hope you are all up to date and have completed blocks 1 and 2, but if not, here are those links again:
Block 1: https://myfarmhousequilts.blogspot.com/2025/02/qube-block-of-month-sewalong-month-1.html
Block 2: https://myfarmhousequilts.blogspot.com/2025/04/qube-block-of-month-sewalong-month-2.html
As I have mentioned previously, the blocks are going to get progressively more tricky to construct so that by the time we are done with the BOM you will have had a chance to use ALL the basic shapes in your Qubes ( 1-8) and you will hopefully feel very confident using any and all of the dies to create your own wonderful, amazing quiltblocks :).
Here is BLOCK 3:

This block is called SAWTOOTH STAR and it consists of one larger center square, 4 small corner squares, and 4 sets of Flying Geese.

You will notice that Accuquilt used way more color in their blocks than I used in mine. It is totally up to you what you want to do. This is your quilt so you are the boss!
These are the shapes you will need from your Qube:
Shape 1~center square~ need 1
Shape 2~small corner squares~ need 4
Shape 4~quarter square triangles~ need 4
Shape 5~half-square triangles~ need 8

Subcut your fabric and make sure to lay your fabric on your dies with selvedge going through your machine sideways, and the sticker on the die facing your belly, just like this:

Also remember that you line your fabric up with the blade, not with the edge of the die.


If you are wondering what the measurements on my dies are for, they allow me to quickly glance and see how wide and long to subcut my fabric. It is a real timesaver!
Once you have cut all your shapes, lay them out:

You are now ready to assemble your Sawtooth Star!
Start by sewing your Flying Geese units together: Because the dog ears have already been cut off, it is really simple to see where to line up your fabrics:

You will have a perfect match at the corner, and a little "peak" showing at the bottom. Accuquilt recommends you sew a perfect 1/4" seam, but my blocks always turn out nicer if I sew a scant seam ( I must press horribly!), so use what works best for YOU.
I like to start sewing at the squared off end, but again, you can do what works best for you.

Press the seam allowance towards the half square triangle ( to the outside).

Next it is time to sew the other "wing". Line up your fabric, again, with the flat sides matching and a little piece peaking out. 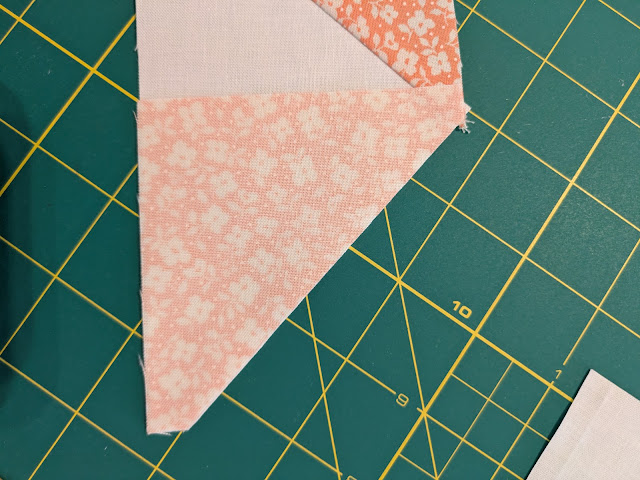
I find it easier to sew from the "flat ( as seen on the bottom in this photo) side" to the peak so that there is no bulk to start sewing in, BUT if you want to start from the top I recommend you use a "leader"( a small scrap to start sewing one~then just feed your Flying Geese through right behind it).

Press towards the Half Square Triangle again.
Repeat this for all 4 of your Flying Geese units.
If your Geese are not perfect, no worries! As long as you have a 1/4" seam allowance at that intersection, they will look pretty darn good!

Next, you need to sew the 4 corner squares to two sets of Flying Geese. Press towards the squares.

And then sew the remaining Geese to the large center square. Press towards the center square.

When sewing the Geese, make sure to watch and save that 1/4" seam so that you end up with nice points!


Finally, sew your block components together.


Again, make sure to preserve that 1/4" seam to get those nice points on your Geese!
At this point Accuquilt recommends you press your seams open, but I found my block laid nicer when I pressed towards my center square. See what works best for you.
And there you have your completed Sawtooth Star block!


I think she is super pretty and an entire quilt made out of these would be just gorgeous!
All the Qubes contain the exact same SHAPES, but they are all different sizes, so I decided that I was also going to make these blocks with my 4"Qube and here is that little block: 

In this photo it could be any size, because there is nothing to compare it to, but here it is next to the block made with the 12" Qube: 


Aren't they fun?
And here are all my blocks so far:

the 12" collection....

and the 4" collection
Have fun making yours and don't hesitate to ask questions if something is not completely clear! I want you to be succesful and have a good time making these blocks :).
Until next time~happy sewing!
Monique
Thanks Monique! I also wrote the minimum cut size on my die- I put it on the label though. I also mark which qube the die belongs to so they stay sorted.
ReplyDeleteYour blocks are so lovely. I find the clearest way for me to think about orienting the fabric is that the selvedge/length of fabric goes parallel along the label sticker, and the sticker is parallel to my body. The other descriptions all seem ambiguous to me!
Yes, whatever works for each individual is great. I find eventually it just becomes natural to place fabric and die the correct way ;)
DeleteAs usual, I love your directions as you make it very easy to understand. I am now setting out to make additional blocks out of each months so I have enough at the end to make a quilt. So fun. My first block of the month and sew along wo it is a blast
ReplyDeleteI am so happy to read this! But don't forget that we will be making 9 blocks and , depending on what size Qube you are using, those should be enough for a wall or throw quilt :)
Delete